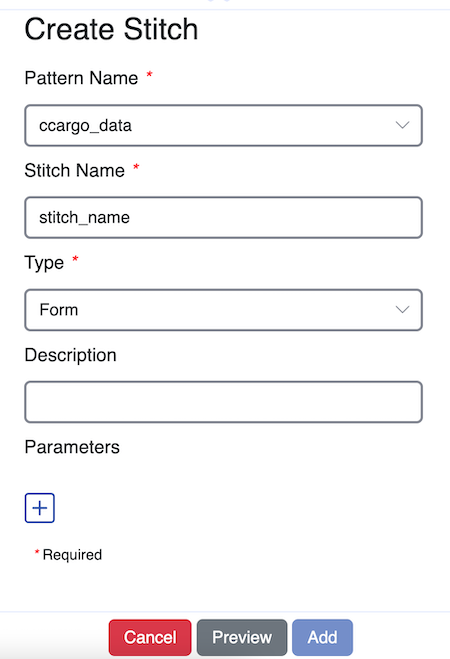
Create a Stitch
1. Stitch Query Types
1.1 SQL Stitch.
An SQL Stitch type is the most commonly used in Sheetloom. It comprises an SQL query, a predefined database connection, and optional parameters.
1.2 SuiteQL Stitch
For clients with a NetSuite installation. SuiteQL code is used to query NetSuite via a preconfigured connection established during Sheetloom´s onboarding process.
1.3 Form Stitch
A Form type Stitch provides the means to dynamically parameterize a spreadsheet.
A user selects one or multiple values at runtime from a pre-supplied form built in the Parameters page. The selected values are copied to the generated sheet in list form, and can be extracted and referenced in Excel formulas.
For more details see a case study showing how to work with the Form Stitch type
2 Create an SQL or Suite SQL Stitch
Navigate to the Patterns page and click Create Stitch.
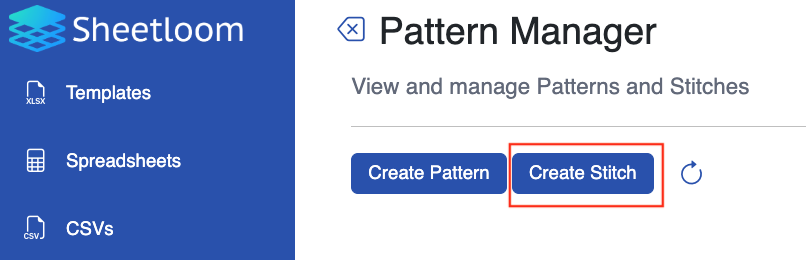
The Create Stitch panel displays
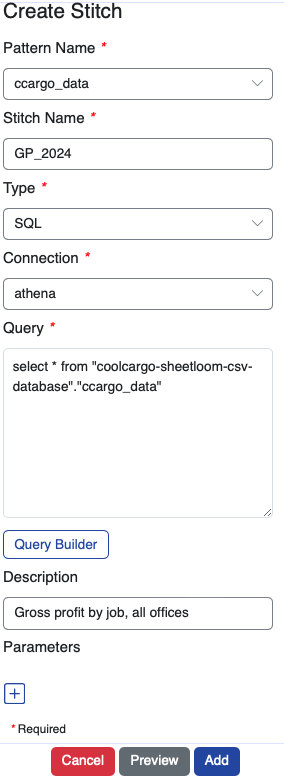
2.1 Stitch Elements
| Field | Description |
|---|---|
| Pattern Name | The name of the Pattern to save the Stitch to. Select from a dropdown list of all Patterns. |
| Stitch Name | The name given to the Stitch. |
| Type | The query type: SQL, SuiteQL or Form. |
| Connection | The connection to use when running this query. Choose the required connection from a pre-populated dropdown list. |
| Query | The query to be to executed at runtime. |
| Query Builder | A graphical interface to enable non-technical users to build a simple SQL query using a CSV data source. The generated query is saved to the Stitch configuration panel. Only available with an Athena connection |
| Description | Optional description box. |
| Parameters | Used if the query is parameterized. Use the +/- buttons to attach/remove an existing parameter to the Stitch. |
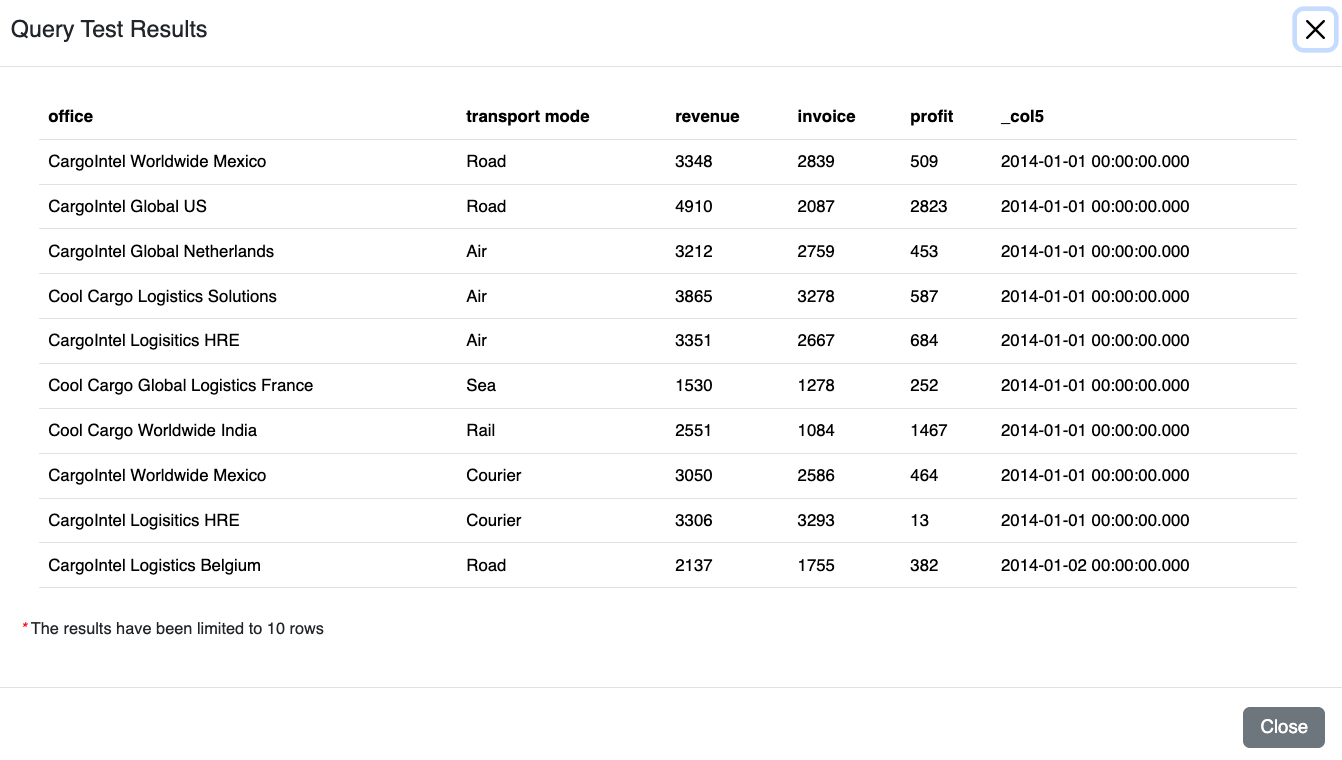
Input the Stitch details. Click Preview to view and review the data. The first ten rows display.
Click Close, then Addto add to save the Stitch to the Pattern.
The Stitch can now be mapped to the Excel template.
2.2 Add a Parameter
To allow dynamic filtering at runtime the query can be parameterized using “?” in the WHERE clause. The column name used for the parameter must match an existing parameter separately created in Sheetloom and which is assigned from the Parameters dropdown box. See how to create a parameter here.
In Create or Edit Stitch, add the required parameter into the WHERE clause of the SQL Query:
WHERE parameter name =?
Click on the + sign to open up a list of Sheetloom parameters and add the corresponding one for the query.
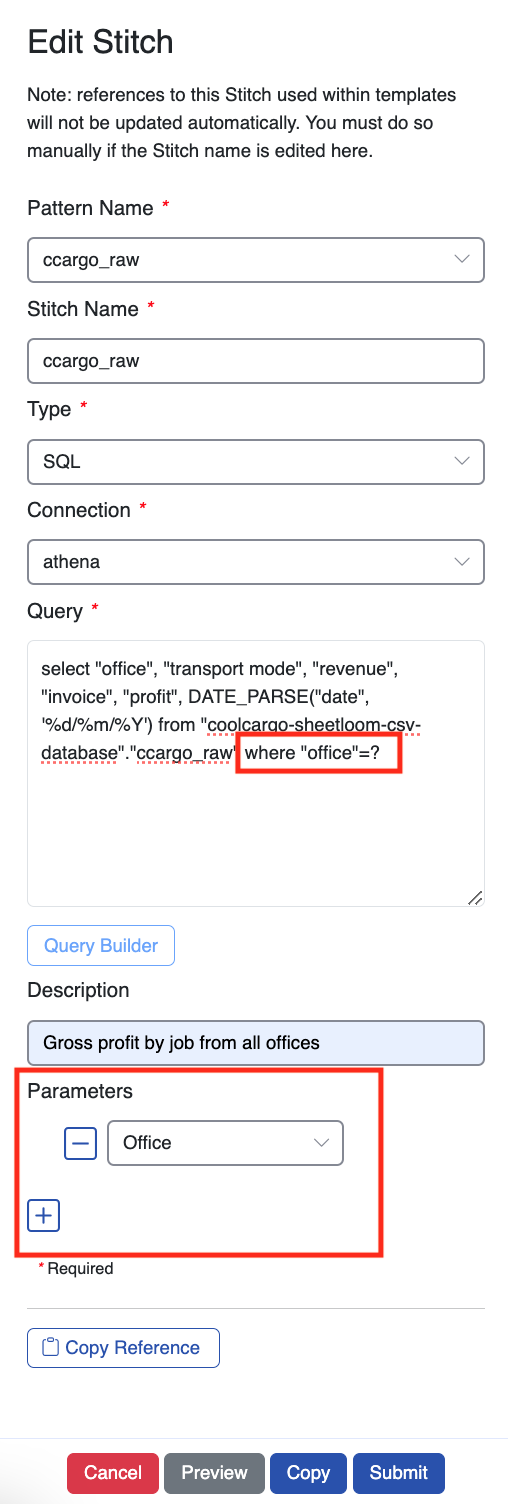
Multiple parameters can be added by adjusting the query and adding in further parameters.
Click Preview to open and review the query. A parameter prompt displays. Enter the test value and click Submit. The first ten rows of the results are returned.

Click Closeto shut down the preview then Save
In the example a parameter called Office was created in Sheetloom and added during Stitch configuration to match the parameter name in the SQL query. At runtime the user is presented with the dialogue box as shown above in the Preview, and prompted to enter a filter value.
3. Create a Form Stitch
Navigate to the Patterns page and click Create Stitch.
The Create Stitch panel displays. In the Type field, select Form from the dropdown.
3.1 Form Stitch Elements
| Field | Description |
|---|---|
| Pattern Name | The name of the Pattern to save the Stitch to. Select from a dropdown list of all Patterns. |
| Stitch Name | The name given to the Stitch. |
| Type | The query type: SQL, SuiteQL or Form. |
| Description | Optional description box. |
| Parameters | Required for filtering on Form types. Use the +/- buttons to attach/remove an existing parameter to the Stitch. |
Select the Pattern Name to save the Stitch to then add the name of the Stitch and, optionally, a description.
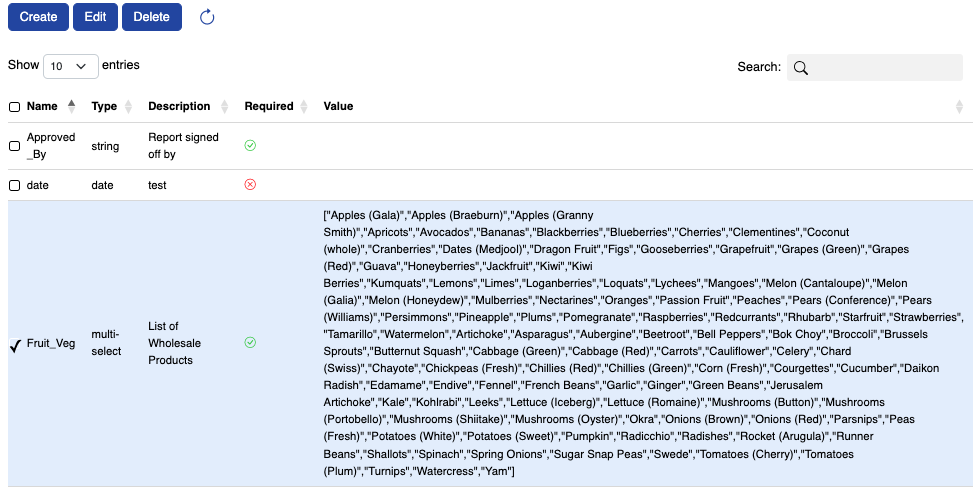
Add the corresponding parameter from the Parameters dropdown box. It must have been previously created and be of the Type = multi-select. See how to create a parameter here.
Click Select to preview the results, then Add to save the Stitch. When Form type is selected, the corresponding parameter must be supplied before the Stitch can be saved.
The Stitch can now be mapped to an Excel template.
A Form type Stitch is not linked to an SQL query, but it must still be added into a template. This enables Sheetloom to detect the Stitch to named range mapping, and serve the user the multi-select form.
3.2 Stitch Form Type Example
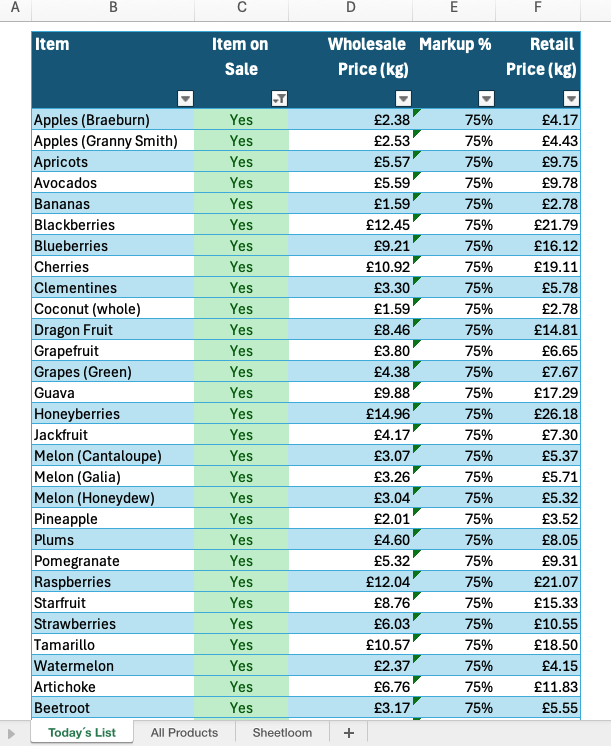
A simple use case is for a supermarket that dynamically updates the day's fresh fruit and vegetable items for sale list to create this table.
At runtime, items that were purchased at the wholesale market for sale that day are selected from a pre-supplied all items list. Sheetloom inserts the chosen list into the spreadsheet, and lookup formulas reference it to automatically generate today´s items for sale list.
Step 1
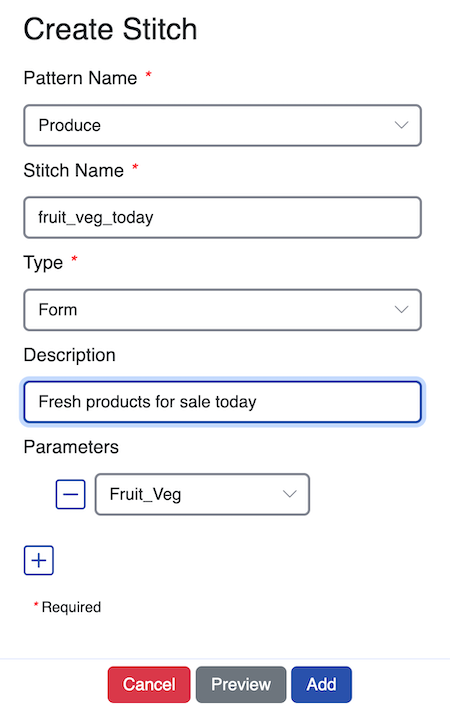
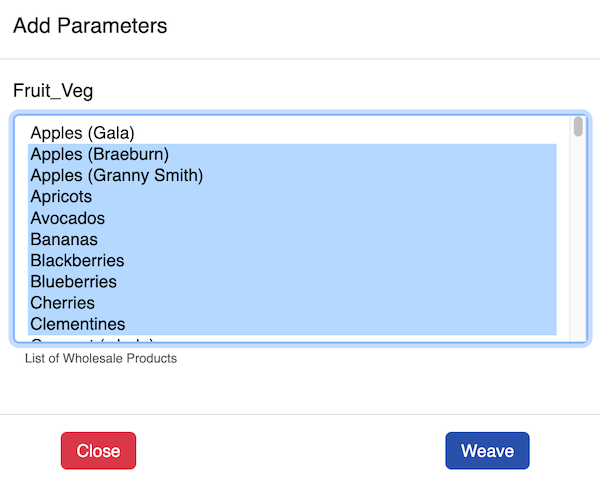
Create a type = Form parameter containing a list of all items for sale. In the example the parameter is named Fruit_Veg
Step 2
Create a Stitch with Type = Form and add the parameter created in Step 1 to it.
Step 3
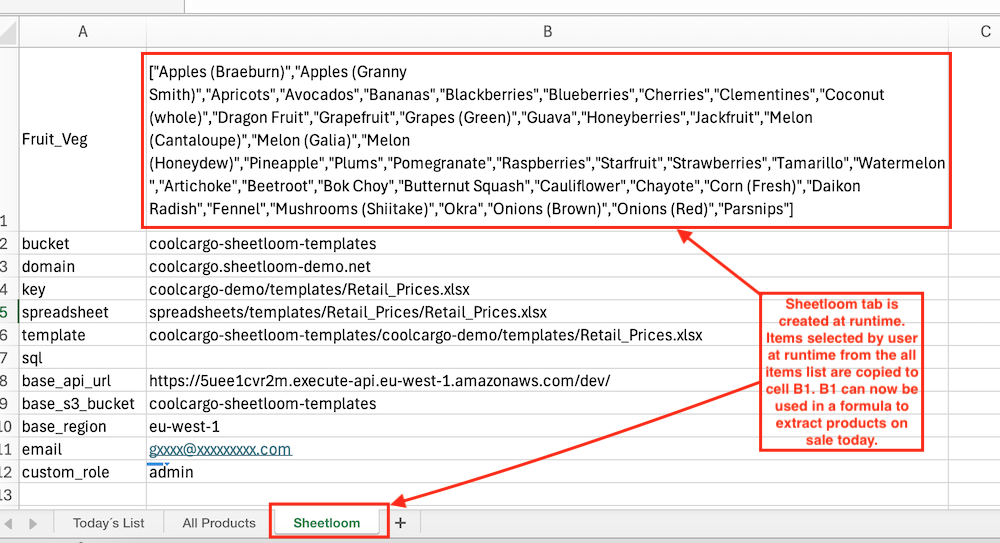
Create an Excel file containing only the Stitch reference in the named range, in our example produce.fruit_veg_today. The named range can be any cell. Weave and download the file, selecting several items from the parameters pop up that displays.
The list selected is injected into cell B2 of the Sheetloom tab that is auto- generated during weaving.
The purpose of this step is to assist in building the formulas in the next step that need to reference the cell the list is output to.
Step 4
Build the template from the sheet woven in Step 3, referencing cell B1 of the Sheetloom tab in formulas.
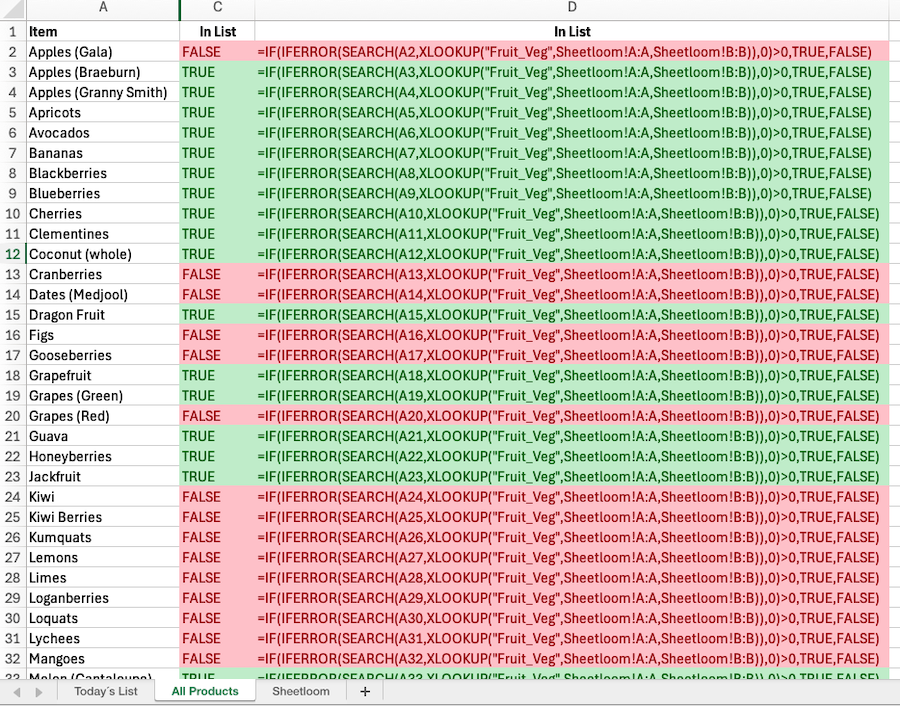
In the example, an Excel search formula is combined with a lookup on each product from the All Items list to determine if it is in the generated list of today´s products provided by the user. If it is a TRUE value is returned, otherwise FALSE.
=IF(IFERROR(SEARCH(A2,XLOOKUP("Fruit_Veg",Sheetloom!A:A,Sheetloom!B:B)),0)>0,TRUE,FALSE)
The image displays a sample of the results, with the TRUE/FALSEcondition (formulas added for context)
Step 5
The final step is to add a formula to the Today´s List table in a separate tab that uses an IF statement to identify product status from Step 4 to show the sale status of each item.
=IF('All Products'!D3 =TRUE,"Yes","No")'
To complete the Today´s List table, wholesale prices and a static markup have been added in separately. The final retail price is calculated.
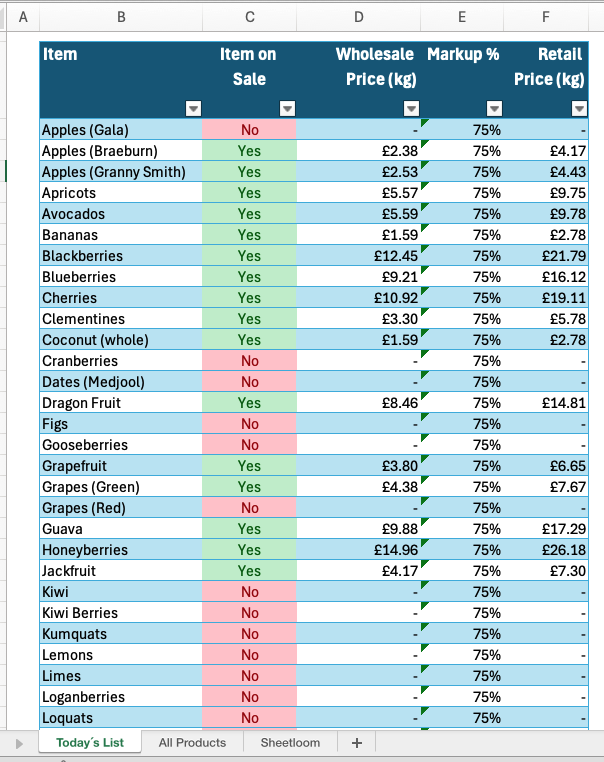
A filter can be applied to display only items for sale.
Once the template and Sheetloom have been configured, all the user is required to do on each weave is to select the list of products for sale. The final table is automatically generated from this selection.
4. Edit a Stitch
Navigate to Patterns and click the Pattern box then the Stitch. From the Stitches page, select the ellipsis or click on the Stitch name and Edit Stitch button that displays.
The Edit Stitch panel box opens. Make necessary changes and select Submit to save the Stitch. Edits can be Previewed before submitting.
Changing a Stitch name will break any existing mapping with any Excel template it references.
5. Copy a Stitch
Navigate to Patterns and click the Pattern box then the Stitch. From the Stitches page select the ellipsis, or click on the Stitch name and Edit Stitch button that displays. The Edit Stitch panel box will open. Click Copy. The Stitch is copied to the same Pattern, appended with “_copy”.
6. Delete a Stitch
Navigate to Stitches. Check the box beside the Stitch name to be deleted and click Delete Stitch. A Stitch can also be deleted by selecting the ellipsis button.